
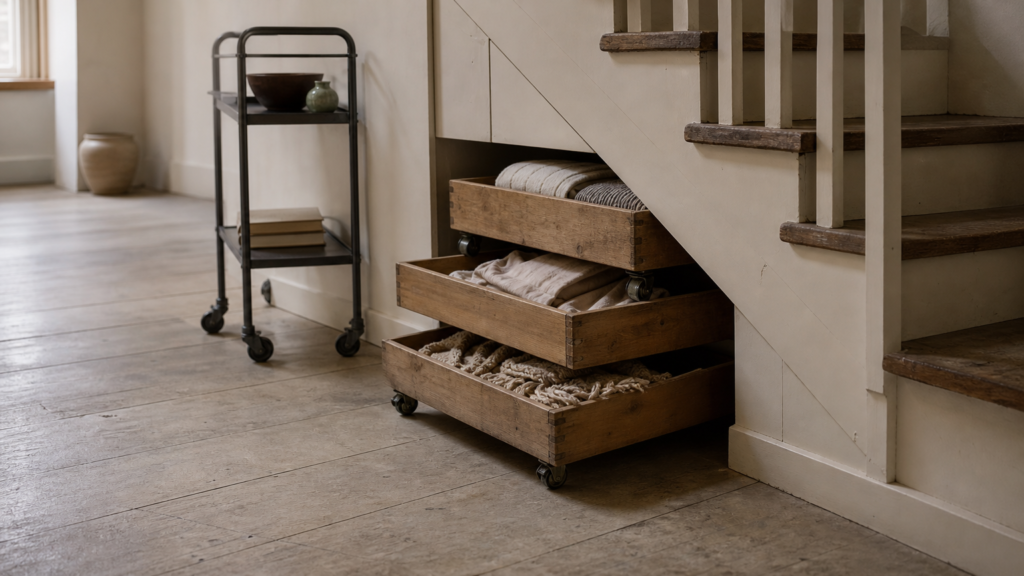
The best storage ideas for under the stairs fit the sloped wedge and the job you need done near it. Custom pull-out drawers can make good use of deep space but need careful planning and usually a larger budget. Open cubbies with matching baskets suit tight budgets. A coat and shoe closet suits stairs near the front door, and rolling bins suit renters who can’t change a thing.
The problem is the shape. The ceiling slopes, the back is deep and dark, and anything you push in there disappears until the next move. Most people either leave the space empty or turn it into a pile. A good setup puts everyday items where you can reach them and gives the awkward corners a smaller job.
Here are seven ways to make the space useful, with setup tips, relative costs, and suggestions for renters and homeowners. Before starting, measure the usable depth and height, identify the staircase construction, and check whether storage would block a walkway or exit. Shared escape stairs and some exterior stairs may prohibit storage entirely. Before changing a private stair void, confirm that storage is permitted and have structural work or a new enclosure reviewed by an appropriately qualified professional against local requirements.
Check whether storage is permitted beneath your stairs
Short answer: Storage can work under some private interior stairs, but shared exit routes, fire separation, utilities and structural constraints may prohibit it. Check with the owner or local building authority before enclosing the space, and keep all exits clear. The International Building Code illustrates why under-stair enclosures may need fire protection; requirements vary by location and building.
Quick comparison: which under-stairs storage works for you?
| Storage idea | Relative budget | Rental-friendly? | Best use |
|---|---|---|---|
| Pull-out drawers | High | Usually no | Maximum hidden storage |
| Cube shelves and baskets | Low | Yes, if freestanding and stable | Everyday household items |
| Coat and shoe closet | Low to moderate | Existing closets only | Entryway clutter |
| Pull-out pantry | Moderate | Depends on installation | Kitchen overflow |
| Rolling bins and carts | Very low to low | Yes | Toys and seasonal supplies |
| Cleaning-supply closet | Low | Usually, with removable fittings | Long tools and household supplies |
| Storage bench | Low to moderate | Freestanding models | Blankets and entryway gear |
Costs are relative, not fixed price quotes: dimensions, materials, local labor rates, and whether the space needs building work all affect the total.
How to measure an under-stairs space
Measure height, width and depth at the low, middle and high points. Mark the location of pipes, wiring and access panels. Tape the footprint of a proposed unit on the floor, then test whether drawers or baskets can open without blocking a door or walking route. Check load ratings before storing heavy items.
1. Graduated pull-out drawers
Graduated pull-out drawers can make excellent use of an under-stairs wedge. Each drawer is built to the height available at its spot on the slope, and you reach everything without crawling inside. If capacity matters more than cost, this is the best of all the storage ideas for under the stairs.
How to set it up
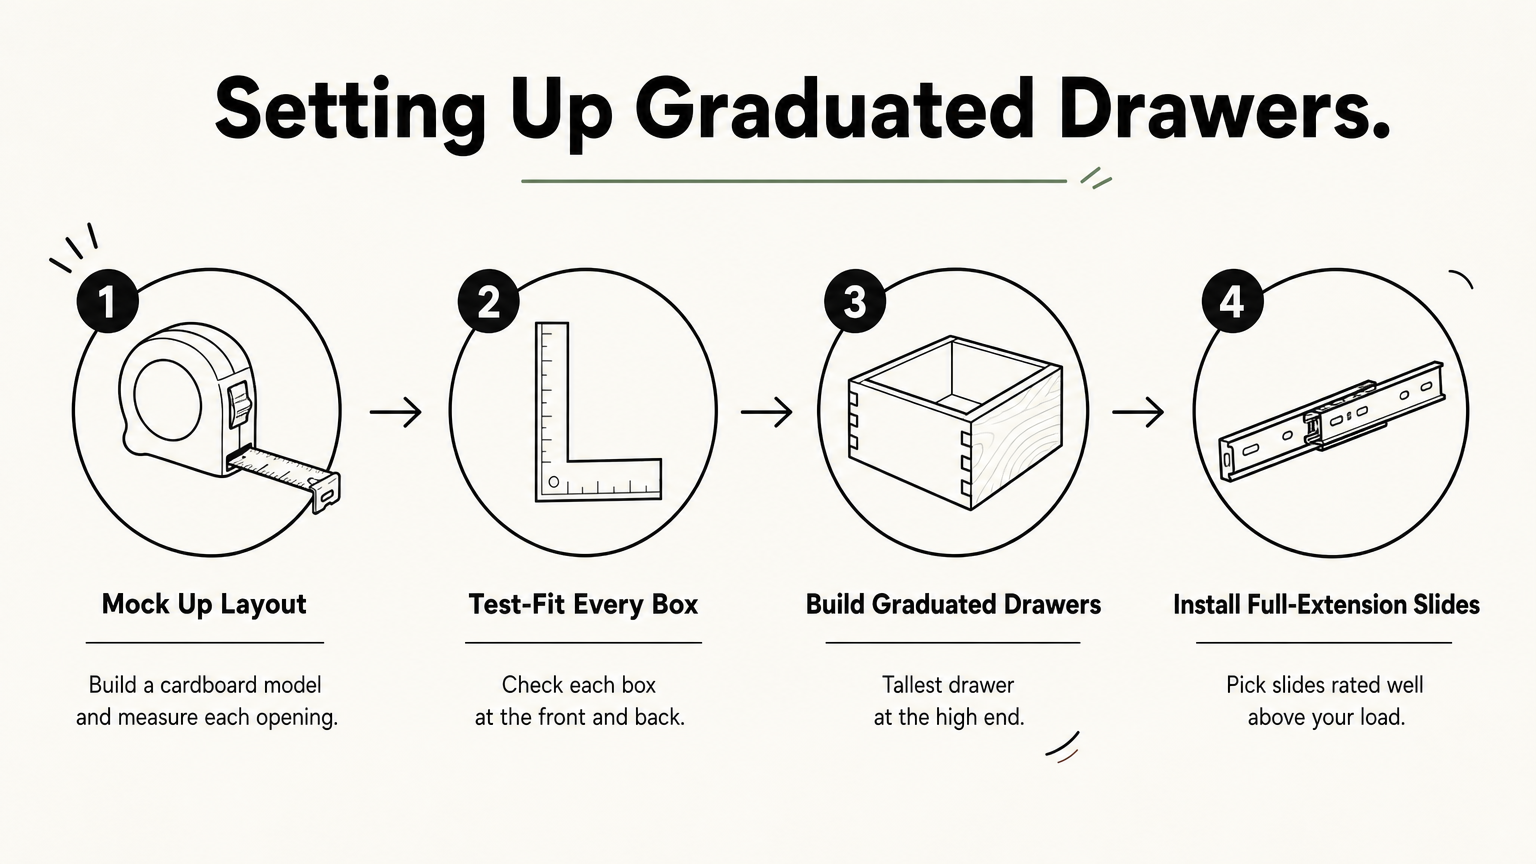
Build a stack of plywood drawer boxes, with the tallest drawer at the high end of the slope and the shallowest at the low end. Use full-extension slides with a load rating well above what you plan to store. A drawer of boots or paper reams gets heavy fast. Add push-to-open hardware or simple cutout pulls so nothing snags clothing in a tight hallway.
Mock the layout up in cardboard first and measure each opening at both the front and the back. Stair spaces are not always perfectly square, so test-fit every box before you commit. Do not cut, notch, or remove stair framing to make the drawers fit. Your stair type decides what’s possible:
| Stair type | What works under it |
|---|---|
| Straight run, closed on both sides | Potentially drawer banks, subject to safety and structural checks |
| Straight run, open on one side | Drawers with finished fronts, or open shelving |
| L-shaped or quarter-turn | Deep storage in the lower wedge, shallow shelf above |
| U-shaped or half-turn | Tall, boxy space with real headroom |
| Winder or floating | Professional assessment first; even freestanding storage may be unsuitable |
Match each drawer height to the slope, and the wedge stops wasting space.
Cost, effort, and best fit
This is the priciest route because slides add up, and it takes skill to get the fronts flush.
- Cost: High, mostly for slides and plywood
- Effort: Advanced DIY, or hire a carpenter
- Best for: Homeowners who want maximum capacity
- Skip if: You rent, or your stairs are floating or winder
2. Open cubbies with matching baskets
Open cubbies with baskets can be affordable when you already own suitable shelves; compare the full cost of units, fixings and baskets before buying. You can build them from plywood or stack store-bought cube shelves, and imperfect carpentry hides behind the baskets.
How to set it up
Cut shelving to follow the stair line, or stagger cube units so the tallest stack sits at the high end. Fill every cubby with the same style of basket. Mixed containers make the wall look like a junk pile with shelves, while matching ones look planned. Add hanging labels or small tags so everyone in the house knows where things go.
For a renter, properly sized freestanding units are often the simplest answer. They can be removed when you move without changing the staircase. Keep stacked units stable and follow the manufacturer’s anti-tip guidance; ask your landlord before fixing anything to a wall. The CPSC Anchor It guide explains furniture tip-over prevention. Use the lowest, shallowest openings for items you rarely need, such as gift wrap or extension cords.
Use one basket style throughout and cheap shelving looks custom.
Cost, effort, and best fit
This idea works in almost any staircase, open or closed.
- Cost: Low, a few shelves or cube units plus baskets
- Effort: Beginner, one afternoon
- Best for: Renters, families, and anyone on a budget
- Skip if: You want to hide clutter completely, since baskets stay visible
3. A coat and shoe closet
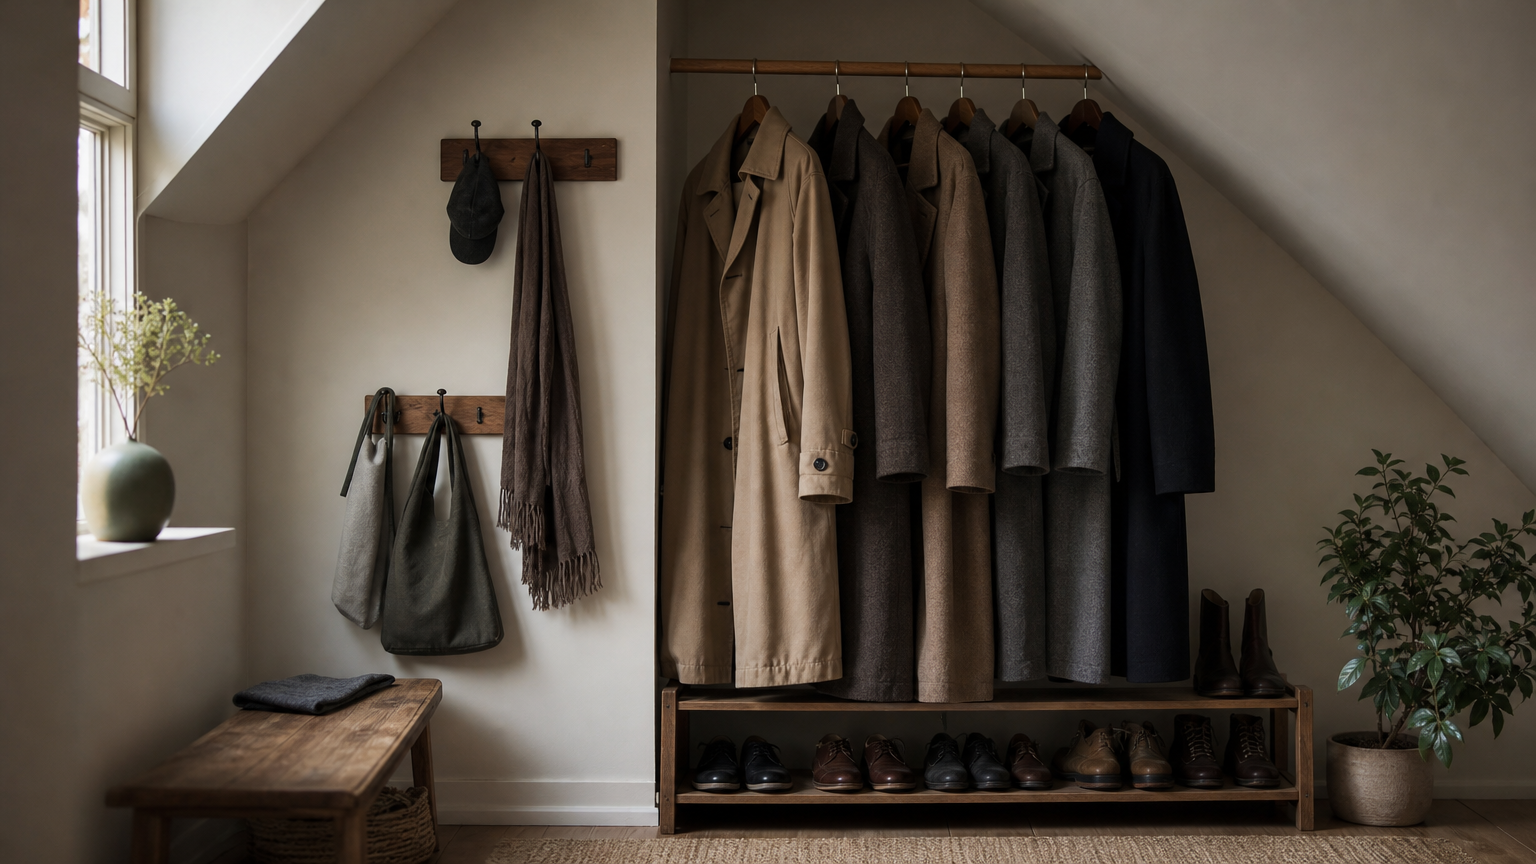
A coat and shoe closet is a strong use of the space when your stairs sit near the front door. You put the tall end to work for long coats and the short end for shoes, so no part of the slope goes unused.
How to set it up
Hang a closet rod at the tall end where long coats clear the floor. Add renter-friendly coat hooks along the side wall at two heights, low for kids and higher for adults. Use the shallow end for a pull-out shoe drawer or a slanted shoe rack. Mount a mirror on the inside of the door for quick outfit checks.
Light is the common failure here. Battery-powered motion lights can illuminate a dark closet without new wiring; fit them securely according to the manufacturer’s instructions. If you add a new door or enclosure, check local code requirements first: some under-stair spaces require protective lining or other fire-safety measures. Do not alter structural stair supports without professional advice.
A closet only works if the tall end holds the long things.
Cost, effort, and best fit
A basic version is a rod, hooks, and a shoe rack, so costs stay modest.
- Cost: Low to moderate
- Effort: Beginner for hooks and rod, intermediate for a new door
- Best for: Homes with stairs near the entry
- Skip if: The stairs are far from where you take off coats
4. A pull-out pantry
A pull-out pantry can work when a dry, suitable under-stair area sits close to the kitchen. Narrow shelves on slides bring cans and boxes to you, so you never reach into a deep, dark cave for a jar of pasta sauce.
How to set it up
Build or buy narrow pull-out shelf units that slide on full-extension runners. Keep each unit shallow enough that nothing hides behind another item. Put heavy things like canned goods and bottled drinks on the lowest shelves, and light dry goods higher. Group by category, such as baking, snacks, and canned goods, and add labels.
A pantry far from the kitchen may be inconvenient, even if the space fits a cabinet. Also avoid spots near a water heater, a furnace, or a damp wall, because heat and moisture shorten the shelf life of food.
A pantry earns its keep only when it sits within a few steps of your stove.
Cost, effort, and best fit
Slides and plywood drive the cost, so it lands in the middle.
- Cost: Moderate
- Effort: Intermediate, with careful measuring
- Best for: Small kitchens that need overflow
- Skip if: The space runs hot, damp, or far from the kitchen
5. Rolling bins and carts
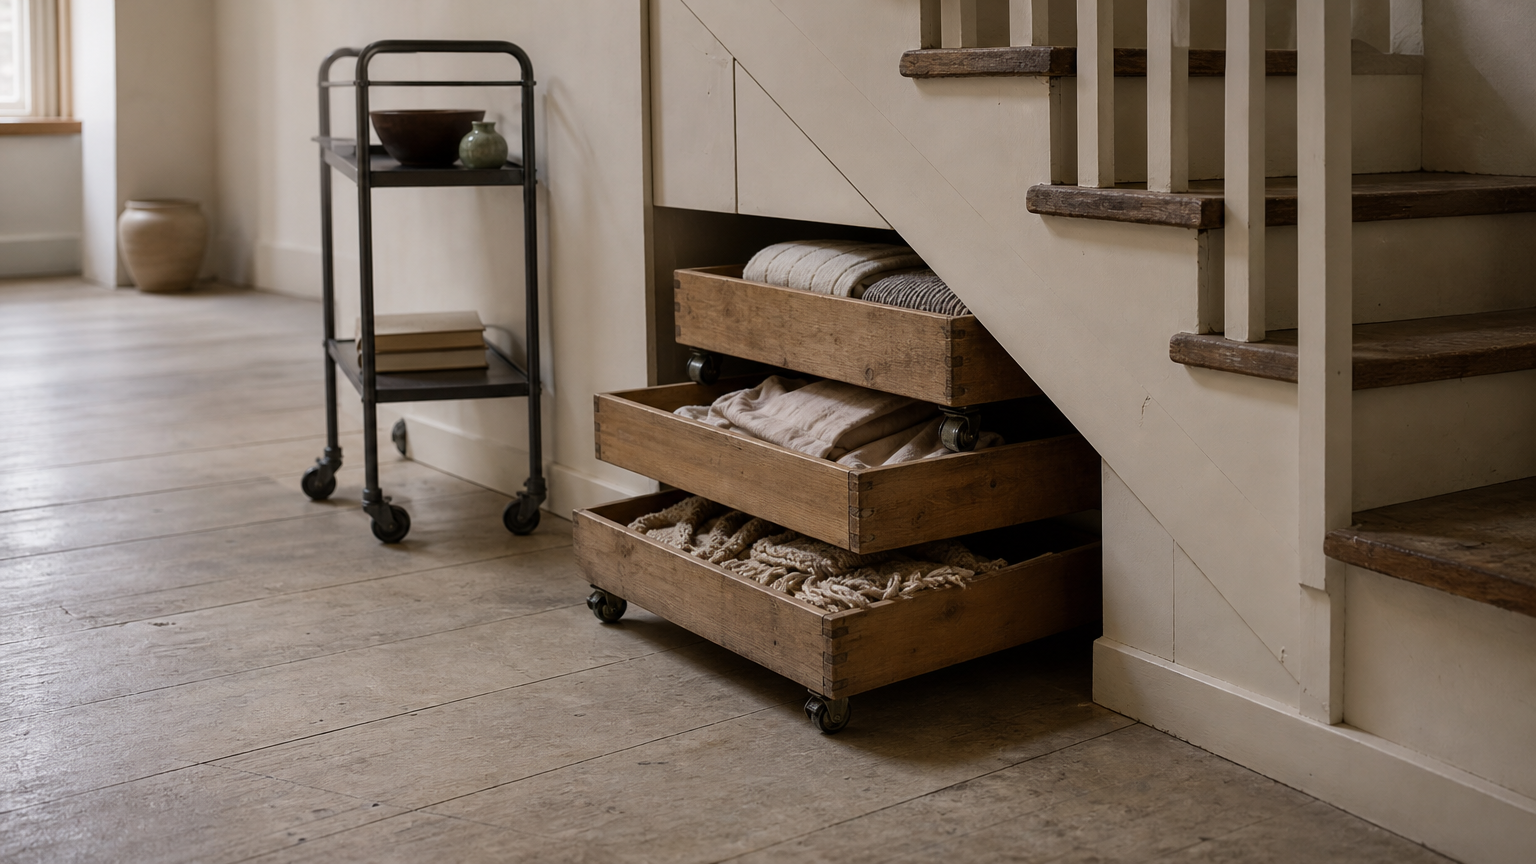
Rolling bins and carts are a simple, tool-free option where under-stair storage is permitted and there is enough clearance to pull them out without blocking a walkway. They can suit renters who want removable storage, but do not assume they are safe beneath winder, floating, or shared escape stairs; check the stair design and local rules first.
How to set it up
Put low wooden crates or plastic bins on casters and slide them in side by side. A slim rolling utility cart fits the taller end. Pull a bin out to reach what you need, then roll it back. Use one bin per category, such as toys, pet supplies, or seasonal décor, and label the front.
Choose casters with locks if your floor is slick. Keep the bins shorter than the ceiling slope at their parking spot, so you can pull them out without scraping the stairs.
If you can’t alter the space, put the storage on wheels.
Cost, effort, and best fit
This is the lowest-risk option because nothing is attached.
- Cost: Very low
- Effort: None, ready in an hour
- Best for: Renters and anyone testing a layout
- Skip if: You want a built-in, finished look
6. A cleaning and laundry supply closet
A cleaning and laundry closet gives the tall end of the wedge to your vacuum, mop, and ironing board. These items are awkward everywhere else, and they usually don’t have a real home.
How to set it up
Stand the vacuum and broom at the tall end, and hang the iron and board on hooks or a door rack. Add a shelf at the shallow end for detergent, dryer sheets, and stain remover. A small bin for spare hangers and a drying rack leaning along the wall finish it off.
Use the space for nonhazardous cleaning equipment and supplies, following product-label storage instructions. The U.S. Fire Administration’s home hazardous-materials advice explains why original containers and safe storage matter. Avoid storing flammable liquids, propane cylinders, and other fire hazards beneath stairs. Charge battery-powered appliances only in a suitable, ventilated location in line with the manufacturer’s guidance; do not add electrical wiring without a qualified electrician and any required permits.
Give the tall end to the longest tools and nothing else needs to fight for it.
Cost, effort, and best fit
Hooks, a few shelves, and bins cover most of what you need.
- Cost: Low
- Effort: Beginner
- Best for: Homes where stairs sit near the laundry
- Skip if: Your supplies include lots of flammable products
7. A bench with hidden storage
A bench with hidden storage can put a low under-stairs corner to work, provided there is enough headroom to sit down and stand up safely. Where the slope is too low for comfortable seating, use a low storage chest instead.
How to set it up
Build or buy a bench approximately 18 inches tall with a hinged lid or open cubbies underneath, then check the actual height and clearance before placing it. Keep walkways and the stairs themselves clear. Use the storage for blankets, sports gear, and kids’ toys, and add a cushion and a row of hooks on the wall above.
On an open-sided staircase, finish the bench to match your trim so it looks like part of the room. Fit soft-close hinges if kids will use it, so the lid can’t slam on fingers.
Use a bench only where people can sit down and stand up safely beneath the slope.
Cost, effort, and best fit
A store-bought storage bench is the simplest route, and a built one adds a custom fit.
- Cost: Low to moderate
- Effort: Beginner if bought, intermediate if built
- Best for: Entryways, kids’ gear, and open staircases
- Skip if: You need space for tall items
Under-stairs storage checklist
- Confirm that storage is permitted in this particular space.
- Keep doorways and exit routes clear.
- Measure at several points and test access with the container pulled out.
- Secure unstable furniture as instructed and keep heavy items low.
- Keep flammables and utilities separate from storage.
For open stairs near seating, see small living room layouts with stairs. If you have more possessions than storage, use the whole-home decluttering checklist first.
Common questions about under-stairs storage
Can renters add storage under the stairs?
Yes, where the area is accessible and suitable. Choose freestanding shelves, baskets, or rolling bins that do not alter structural components. Check your lease before attaching hooks or rails. In shared buildings, confirm that the space is not part of a required escape route.
What should you avoid storing under stairs?
Avoid combustible or hazardous materials, items that block a route out of the home, and anything that needs dry conditions if the space is damp. Check local fire-safety rules before creating an enclosed cupboard.
How do you measure an under-stairs space?
Record the height, width and depth at several points, including the narrowest and lowest sections. Leave clearance for doors, drawers, wheels and ventilation, and check for pipes, wiring or equipment before planning a built-in installation.
Pick one idea and start measuring
The best storage under a staircase follows the slope: tall things at the high end, shallow things at the low end, and everyday items within easy reach. Start by measuring and checking your stair type, then pick the idea that matches your budget and your lease. Drawers, closets, and pantries reward a bigger build, while cubbies, rolling bins, and benches get you organized this weekend.
Before you enclose anything, call your building department, and never cut or notch stair framing without an engineer. Keep flammables out of the space. For more budget-friendly, renter-friendly projects, explore our small-space organization hacks, or start with our small-apartment organization checklist.